Guide for Node Template Migration #
Node Template migration is a one-time process for clusters adopting StackBooster. This guide explains how to review and save your NodeTemplate to complete the migration.
Overview #
Node Template migration applies only to clusters that are transitioning to StackBooster for the first time. When you access a NodeTemplate in such a cluster, you’ll see warnings indicating that you need to review the configuration and save it.
Your task is simple:
- Review the NodeTemplate configuration
- Save the template
The system automatically handles the migration process after you save.
What Happens After Saving #
Once you save the template:
- StackBooster creates new nodes with the configuration you reviewed
- Workloads gradually move to the new nodes
- Old nodes are drained and terminated
- Your cluster transitions to StackBooster management
After Migration is Complete #
Future NodeTemplate updates follow the standard editing process—no migration warnings or special steps required.
When You’ll See Migration Warnings #
Migration warnings appear in specific situations:
You’ll see warnings when:
- Your cluster is adopting StackBooster for the first time
- Existing node configurations need to be reviewed
- The template contains settings that require your attention
You won’t see warnings when:
- Your cluster is already fully managed by StackBooster
- You’re making routine updates to existing StackBooster templates
- The cluster was created with StackBooster from the start
Understanding the Warning Banner #
When you open a NodeTemplate that requires migration, you’ll see this warning:
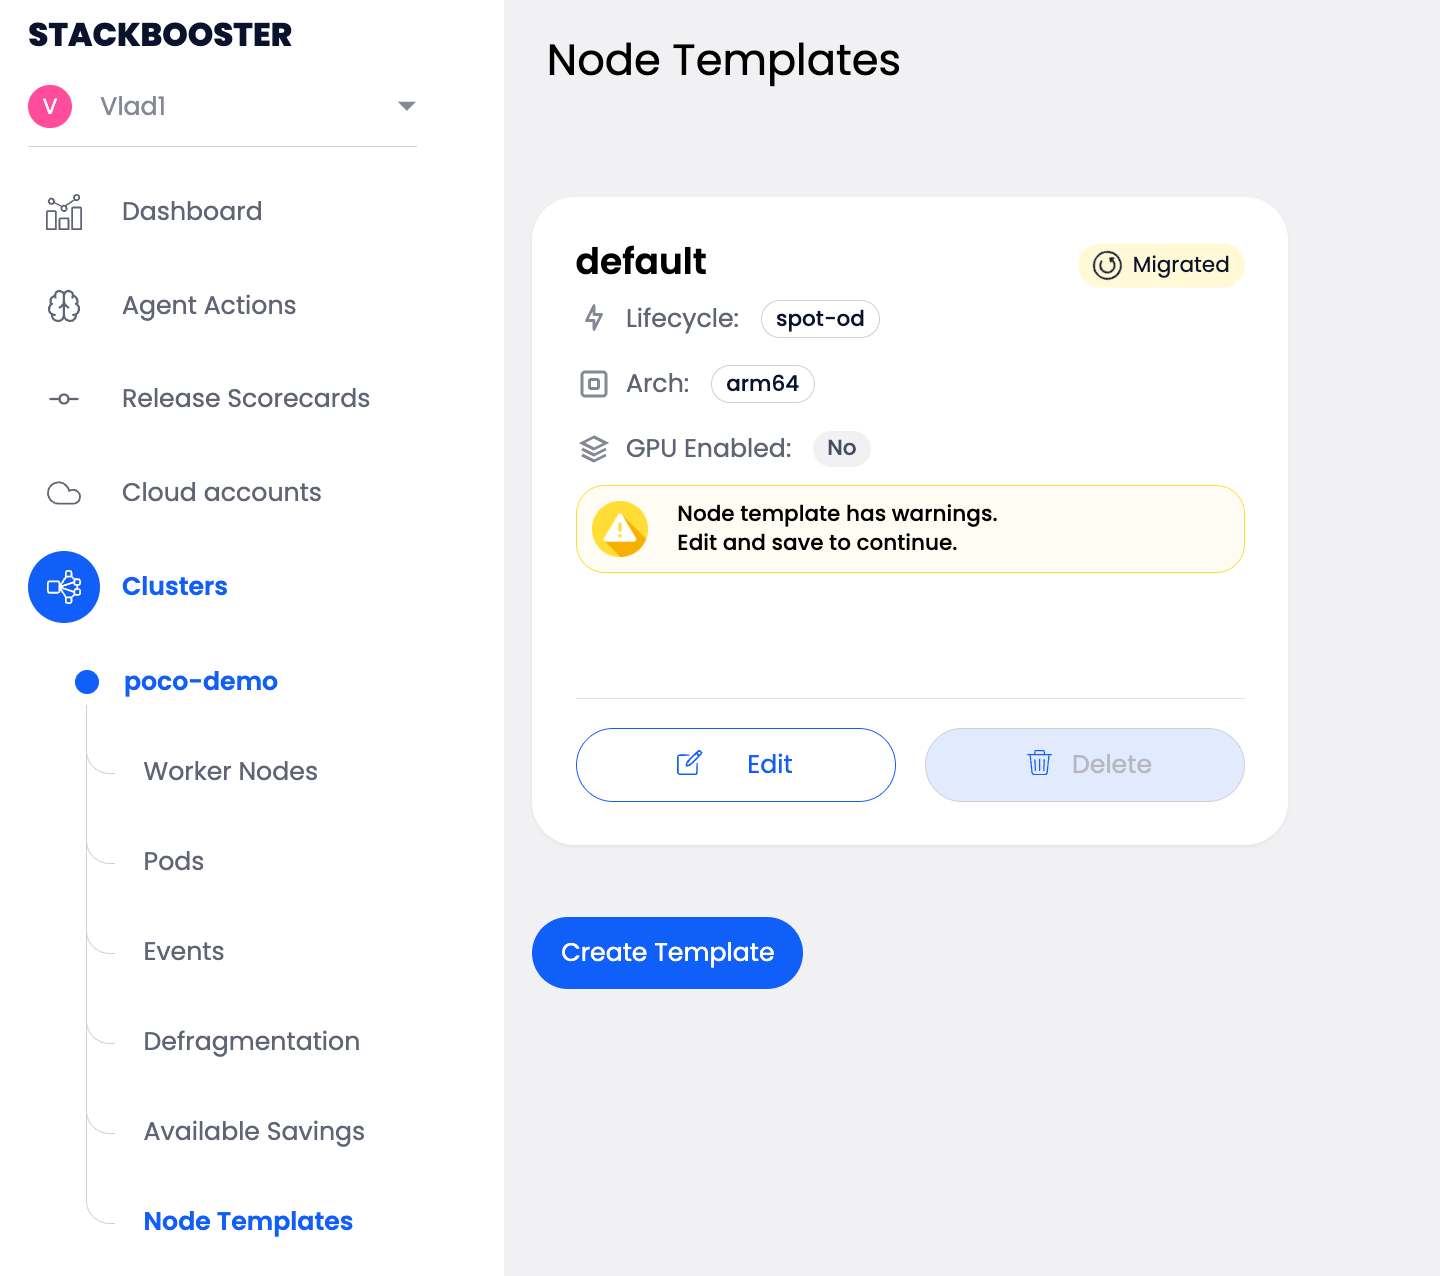
Warning Message:
“Node template has warnings. Edit and save to continue.”
What this means: You need to review the configuration and save it to proceed.
Common Warnings #
You may see warnings like these:

The node pool contains not supported field 'spec.limits'
The node pool contains not supported field 'spec.disruption'
Ami Selector Terms not supported yet. Stackbooster supports only AL2 and AL2023 non-accelerated AMIs
What these indicate:
- Some settings from previous configurations are not supported in StackBooster
- These settings will not be included after you save
- Review the template to ensure it meets your requirements without these fields
How to Complete Migration #
Follow these steps to review and save your NodeTemplate.
Step 1: Access the NodeTemplate #
- Navigate to your cluster’s StackBooster Node Template management interface
- You’ll see templates that need migration
- Click Edit to open the template
Template Status:
- Lifecycle: Instance lifecycle (spot-od, od, or spot)
- Architecture: Target architecture (arm64 or amd64)
- GPU Enabled: Whether GPU support is enabled
- Migrated: Indicator showing if migration is needed
Step 2: Review Warning Messages #
When you open the template, warning messages appear at the top:
Review each warning:
Unsupported Field Warnings:
The node pool contains not supported field 'spec.limits' The node pool contains not supported field 'spec.disruption'- These fields will not be included in StackBooster
- Check if your workloads depend on these settings
- Determine if alternative configurations are needed
AMI Selector Warnings:
Ami Selector Terms not supported yet. Stackbooster supports only AL2 and AL2023 non-accelerated AMIs- StackBooster uses standard Amazon Linux 2 or 2023 AMIs
- Custom AMI selection is not supported
- Verify AL2 or AL2023 is appropriate for your needs
Step 3: Review Template Configuration #
Check all sections of the template to ensure settings are correct:
Basic Information & Pod Scheduling #
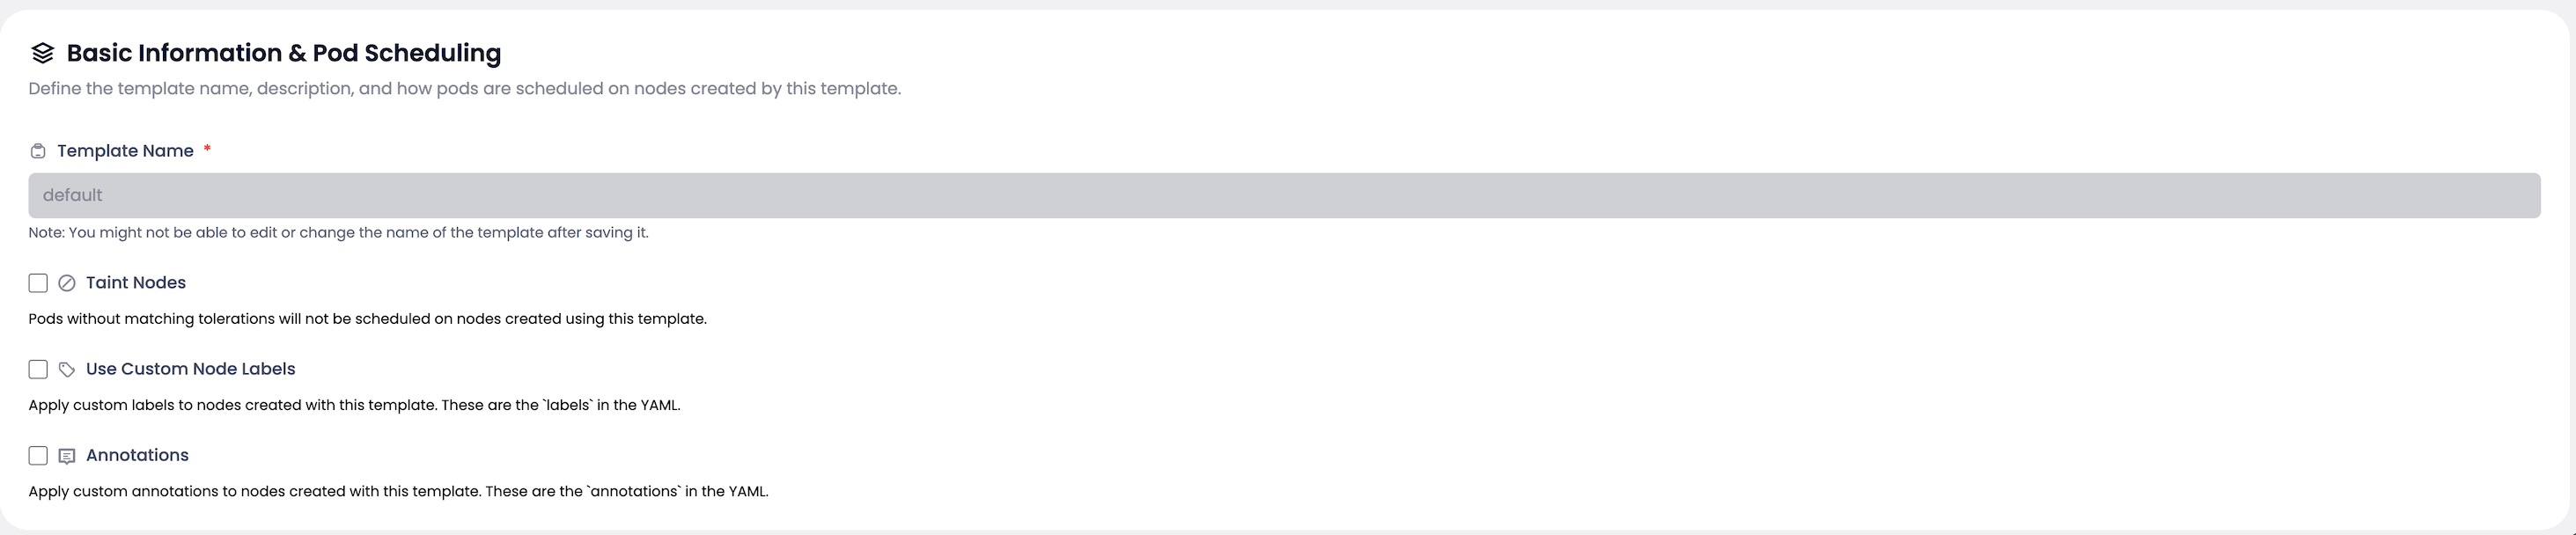
Check:
- Template Name - Correct and descriptive (cannot change after saving)
- Taint Nodes - Taints match your workload tolerations
- Custom Node Labels - Labels align with pod selectors
- Annotations - Metadata and documentation are accurate
Core Configuration #
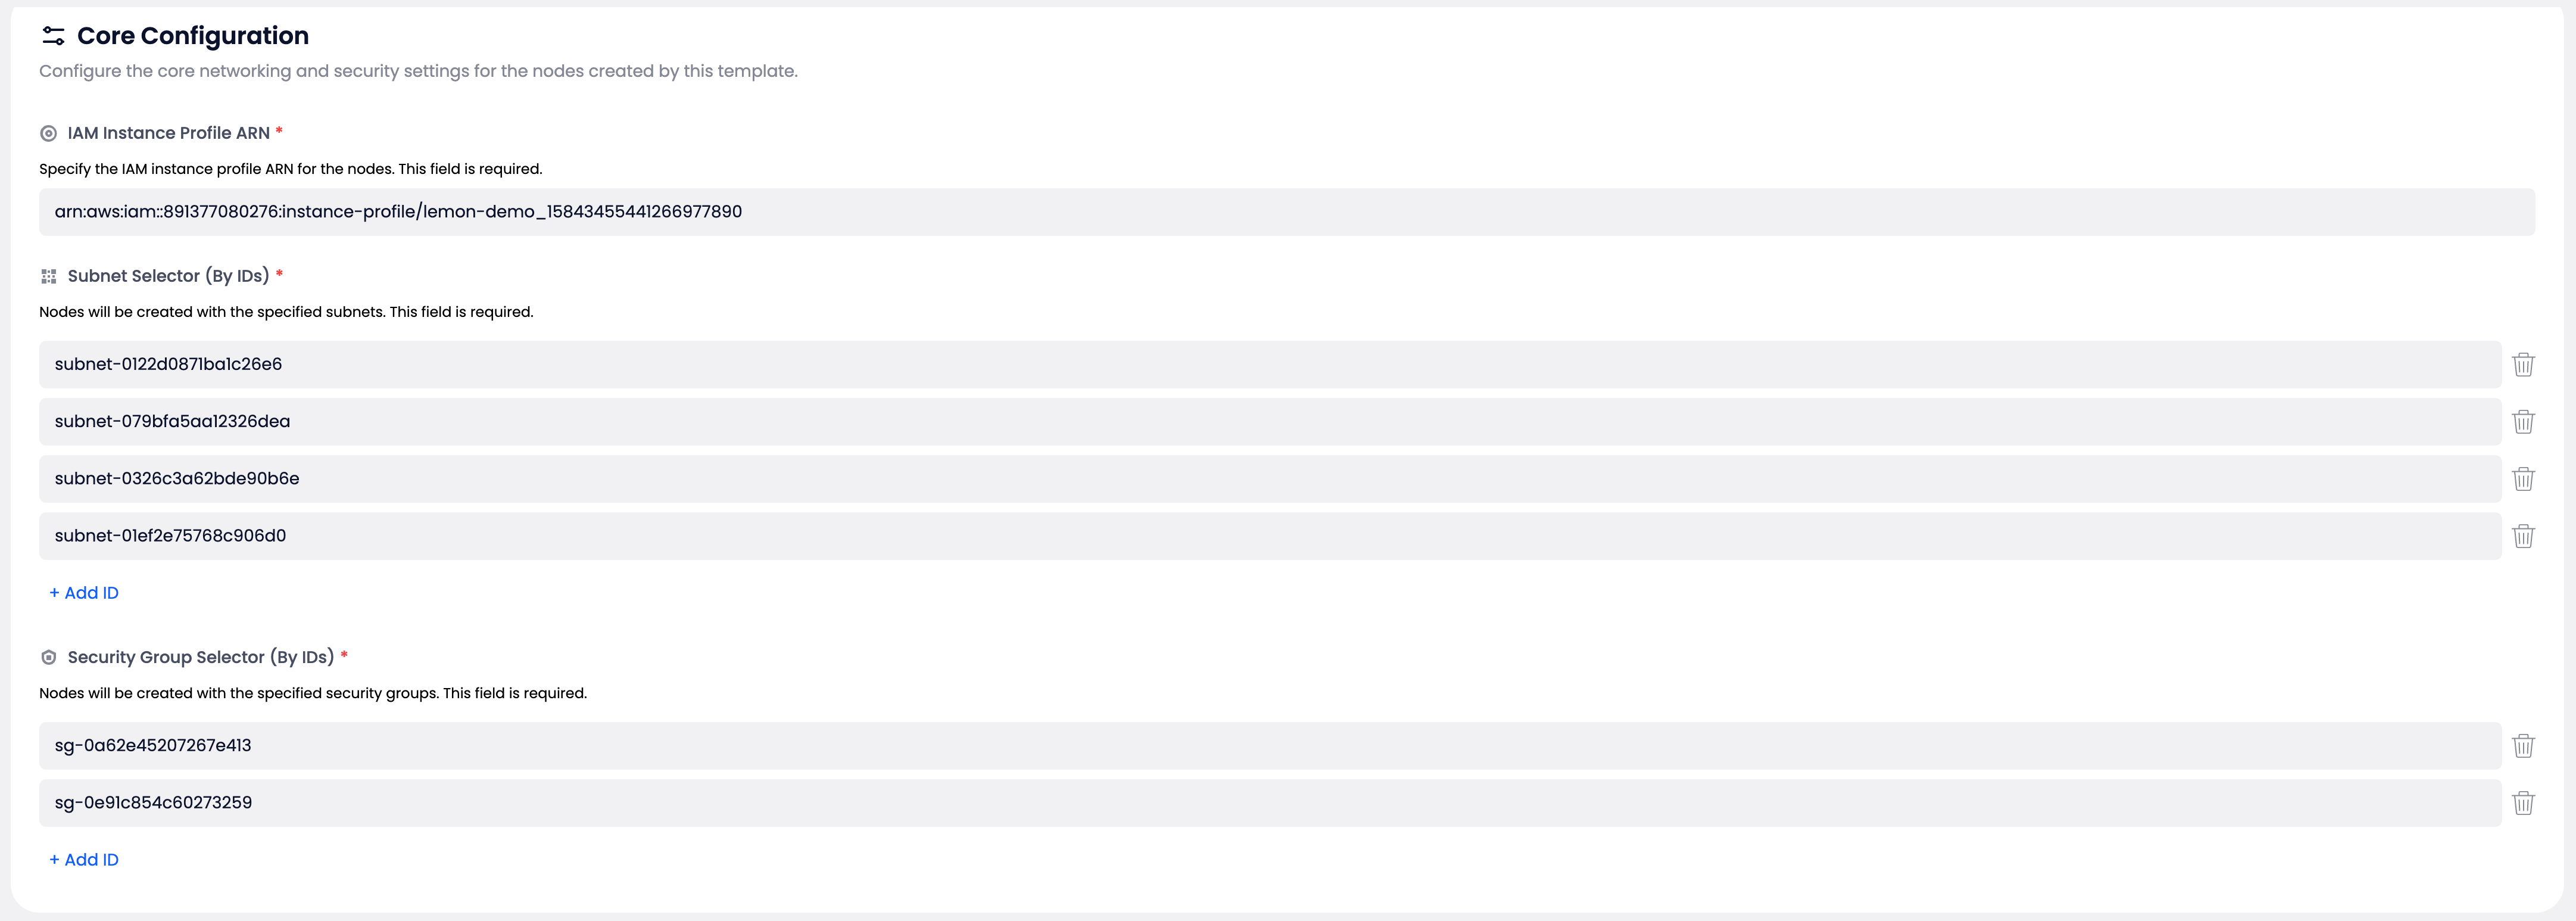
Verify:
IAM Instance Profile ARN:
arn:aws:iam::891377080276:instance-profile/lemon-demo_15843455441266977890
# ✓ Has necessary EC2 and EKS permissions

Subnet Selector (By IDs):
- subnet-0122d087fba1c26e6
- subnet-079bfa5aa12326dea
- subnet-0326c3a62bde90b6e
- subnet-01ef2e75768c906d0
# ✓ Subnets are in correct VPC
# ✓ Distributed across availability zones

Security Group Selector (By IDs):
- sg-0a62e452072767e413
- sg-0e91c854c60273259
# ✓ Security groups allow required traffic
Instance Configuration #
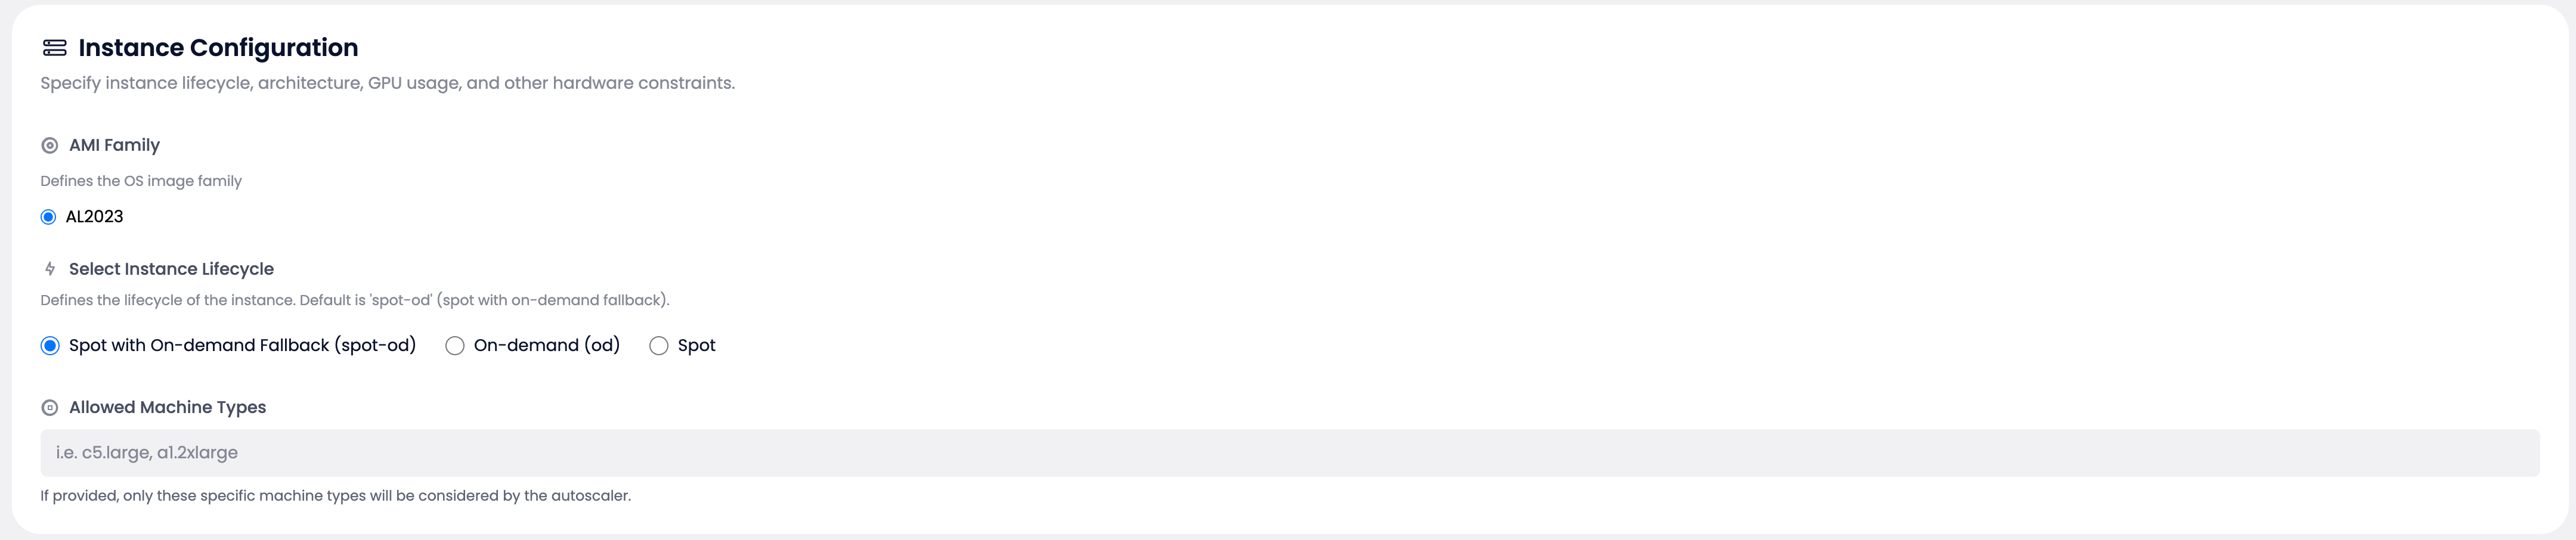
Confirm:
AMI Family: AL2023
# ✓ Compatible with your Kubernetes version
# ✓ Meets your OS requirements

Select Instance Lifecycle:
● Spot with On-demand Fallback (spot-od)  ← Recommended for most workloads
○ On-demand (od)                          ← For critical workloads
○ Spot                                    ← For cost-sensitive, interruptible workloads

Allowed Machine Types:
c5.large, m5.xlarge, r5.2xlarge
# ✓ Instance types available in your region
# ✓ Types match workload CPU/memory requirements
# ✓ Multiple types for better Spot availability
Advanced Configuration #
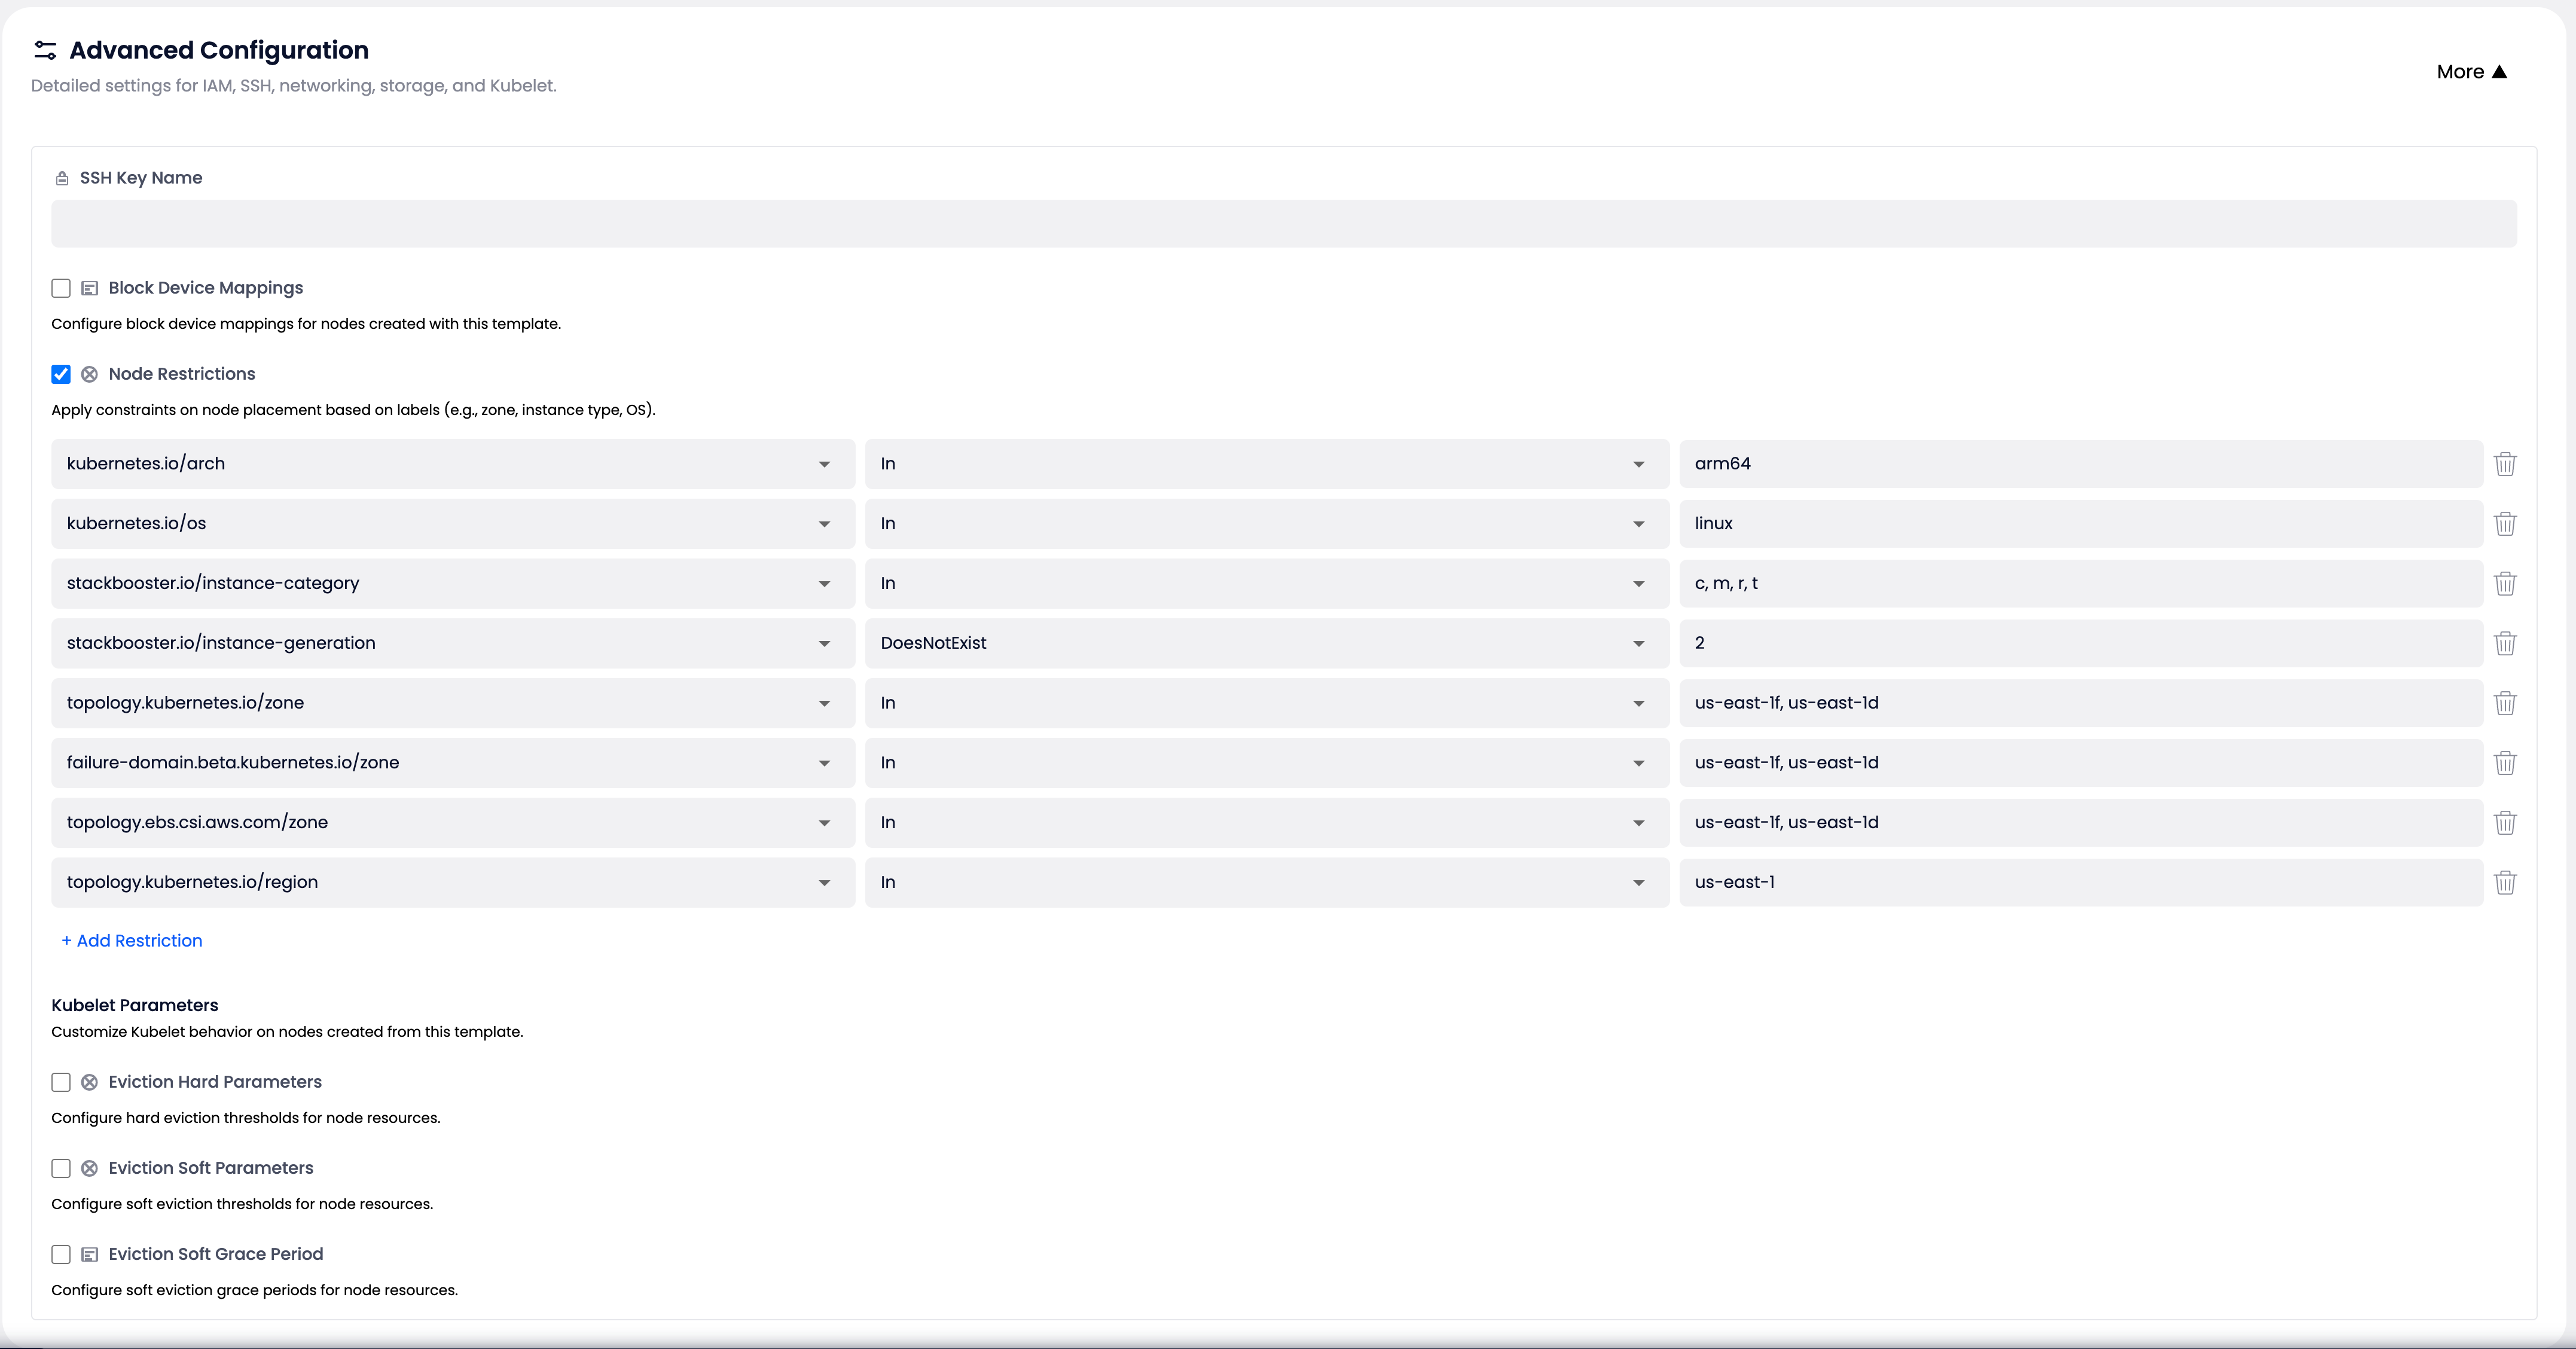
Review:
Node Restrictions:
Node Restrictions (automatically converted):
- key: "kubernetes.io/arch"
  operator: "In"
  values: ["arm64"]

- key: "kubernetes.io/os"
  operator: "In"
  values: ["linux"]

- key: "stackbooster.io/instance-category"
  operator: "In"
  values: ["c", "m", "r", "t"]

- key: "topology.kubernetes.io/zone"
  operator: "In"
  values: ["us-east-1f", "us-east-1d"]
Verify:
- Architecture constraints match your workloads
- Instance category filters are appropriate
- Zone restrictions align with your subnet selection
Other Settings:
- SSH Key Name - Configured if debugging access needed
- Block Device Mappings - Storage size and encryption appropriate
- Kubelet Parameters - Eviction thresholds suitable for your workloads
Step 4: Compare YAML Configurations #
Review the generated StackBooster template compared to the original configuration:
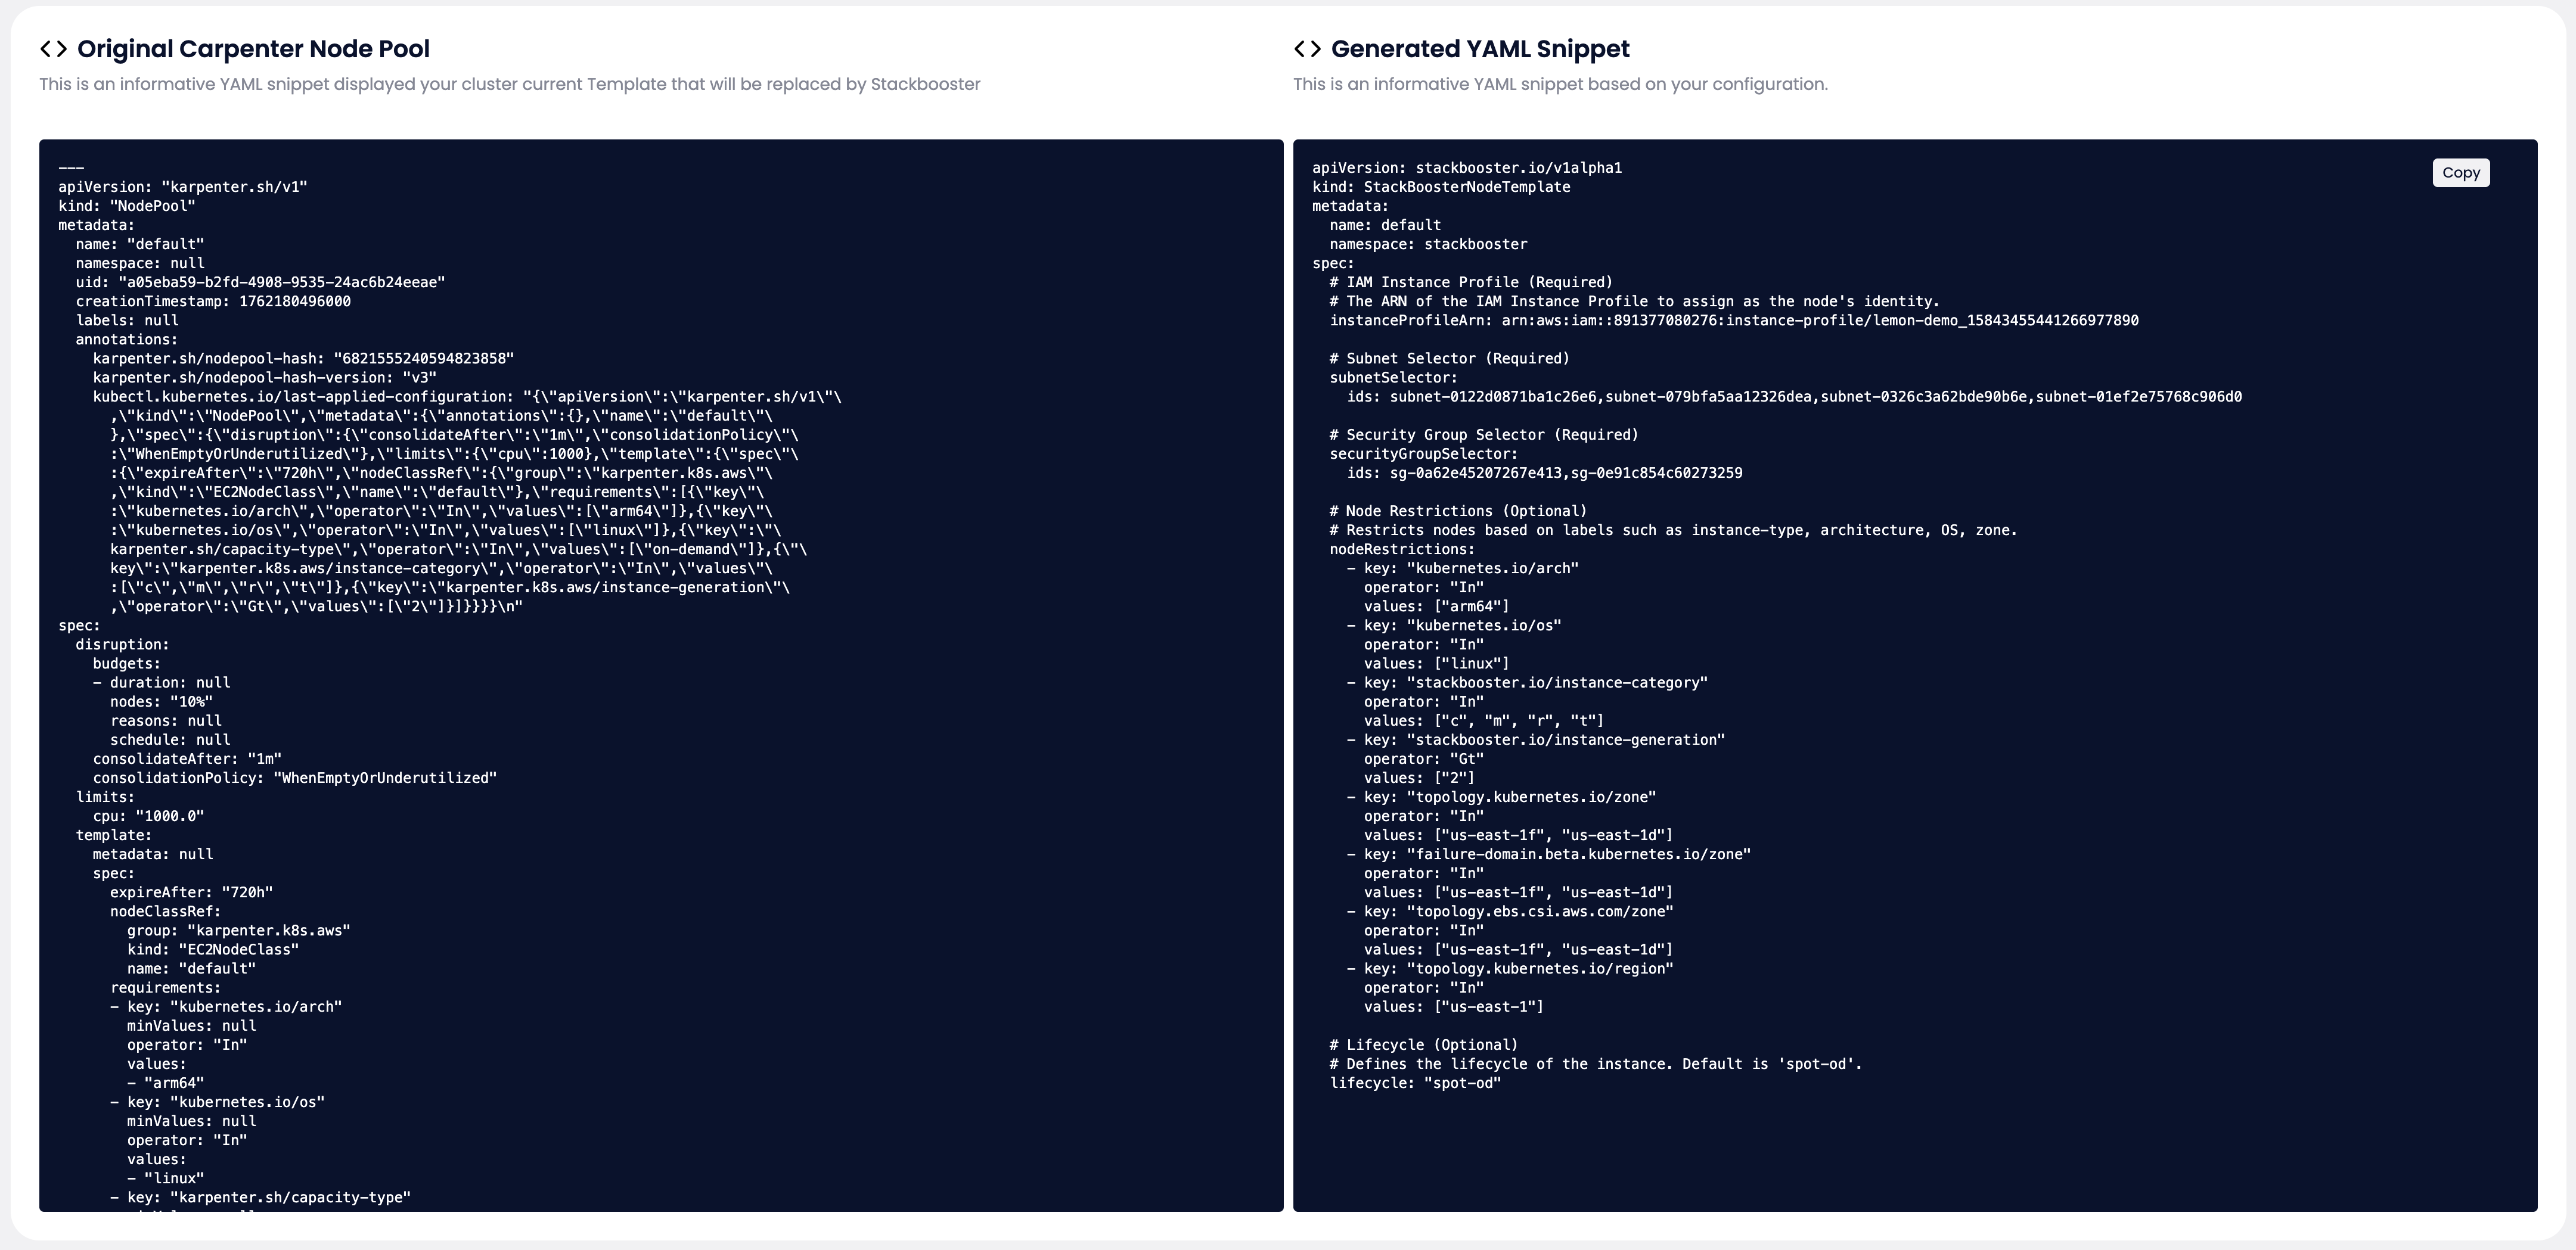
Left Side: Original configuration
Right Side: New StackBooster template
Key Changes to Note:
- API version and resource type changed to StackBooster format
- Configuration structure simplified
- Unsupported fields removed
- Node restrictions converted from previous format
Use the Copy button to save the YAML for your records if needed.
Step 5: Make Adjustments (If Needed) #
If you need to modify any settings:
- Update configuration values in the editor
- Verify changes in the generated YAML preview
- Ensure validation passes (save button becomes enabled when valid)
Common Adjustments:
- Add or remove subnets
- Update allowed machine types
- Modify node restrictions
- Adjust lifecycle policy
- Change taints or labels
Step 6: Save the Template #
Once you’ve reviewed everything and confirmed it’s correct:
- Click the Save button
- Confirm any prompts that appear
What happens next:
- Template is saved with your reviewed configuration