Cluster Defragmentation #
Cluster Defragmentation helps reduce infrastructure costs and improve efficiency by reorganizing workloads across Kubernetes nodes. This process replaces fragmented and inefficient nodes with optimized ones, ensuring better resource utilization and lower hourly costs — without compromising availability.
Over time, clusters naturally become fragmented — a normal byproduct of daily operations such as scaling, uneven pod distribution, node taints, or affinity rules. Additionally, cloud provider pricing can shift, making some instance types less cost-effective than when initially provisioned.
Defragmentation helps by:
- Consolidating workloads onto fewer, better-utilized nodes
- Replacing expensive or poorly matched nodes with cost-effective alternatives
- Adapting to pricing changes to maintain optimal cost/performance balance
- Freeing up capacity for future workloads, reducing unnecessary autoscaling
Defragmentation is initiated manually. Before any changes are made, you receive a detailed plan preview, including cost savings and a full before/after topology of your cluster.
Migration from Non-StackBooster Clusters #
When migrating an existing Kubernetes cluster that was not previously managed by StackBooster, you have the option to perform an initial cluster “Roll” as the finaliziong of migration process.
What is a Cluster Roll? #
A cluster roll is the initial defragmentation operation performed when transitioning from a non-StackBooster configuration to a StackBooster-managed cluster. This process evaluates your existing nodes and workloads, then proposes an optimized configuration that:
- Replaces on-demand nodes with appropriately sized spot instances (where applicable)
- Consolidates workloads to reduce node count
- Selects optimal instance families and sizes based on your actual resource usage
- Significantly reduces compute costs while maintaining or improving resource availability
Roll During Onboarding #
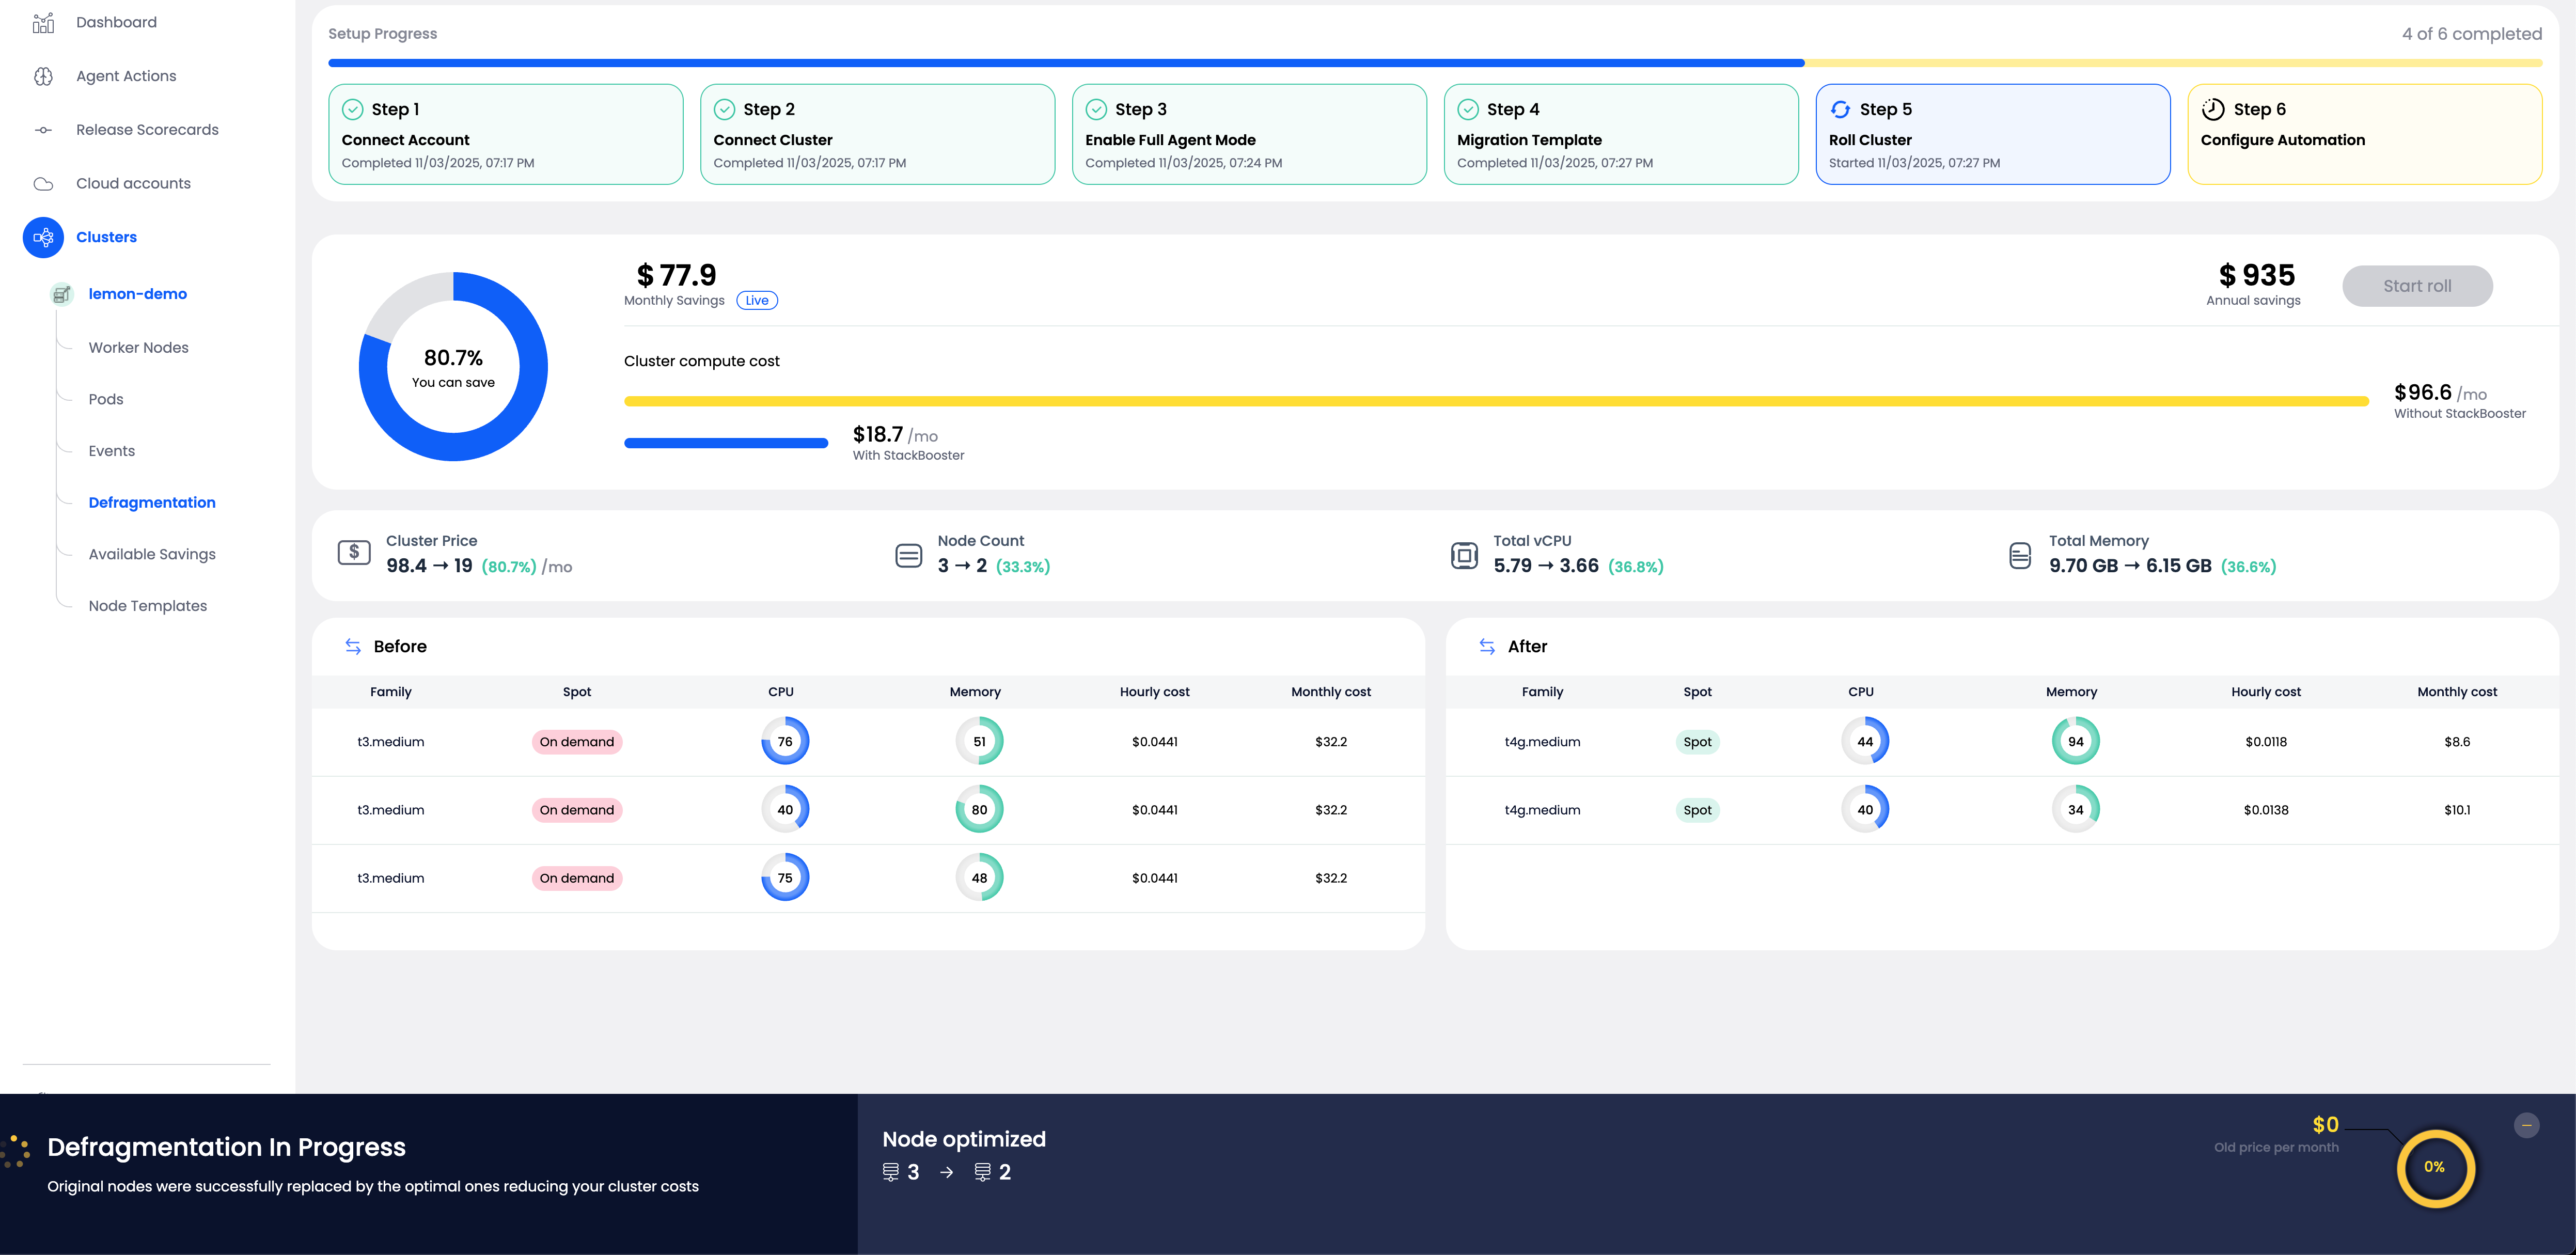
During the StackBooster setup process, you’ll progress through several steps:
- Step 1: Connect Account - Link your cloud provider account
- Step 2: Connect Cluster - Integrate your Kubernetes cluster
- Step 3: Enable Full Agent Mode - Activate complete StackBooster functionality
- Step 4: Migration Template - Configure migration preferences
- Step 5: Roll Cluster - Review and execute the initial optimization
- Step 6: Configure Automation - Set up ongoing autoscaling policies
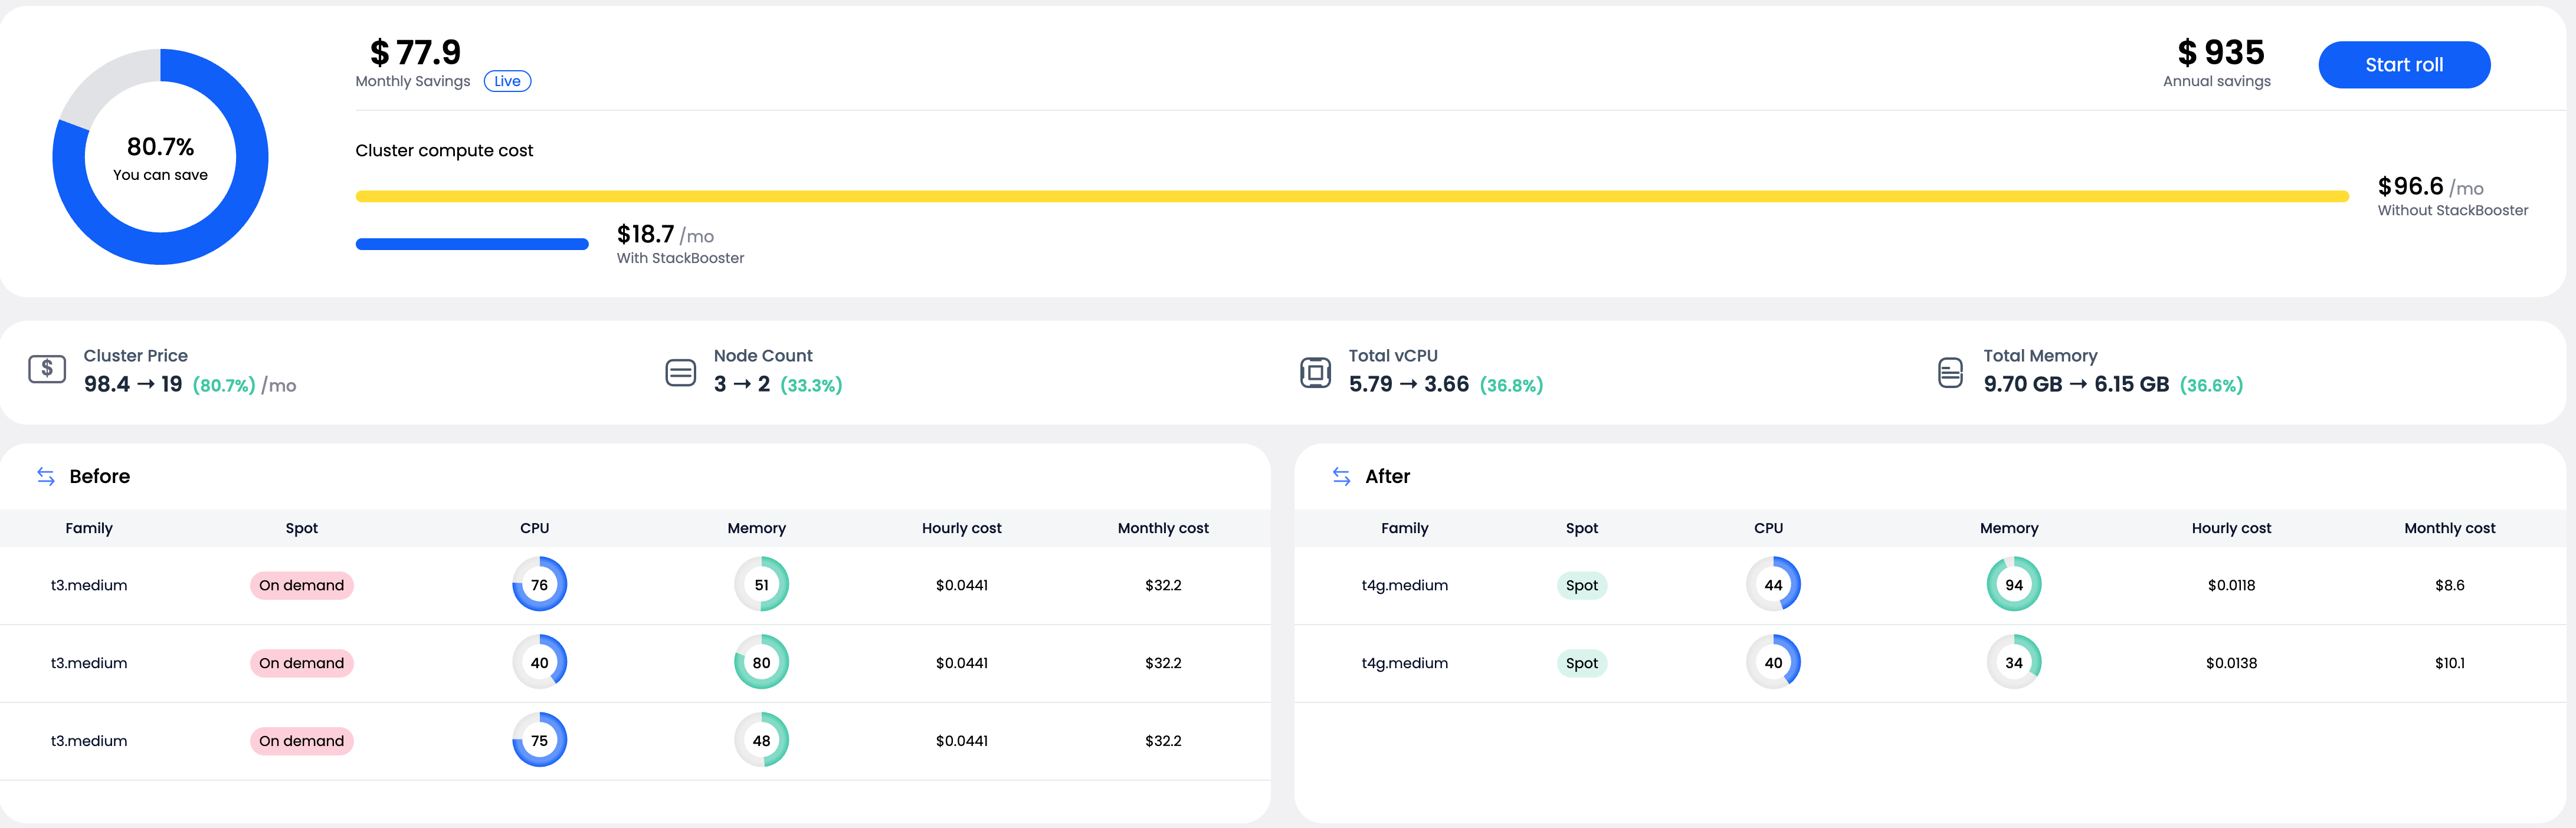
At Step 5: Roll Cluster, you’ll see:
- Current configuration analysis: Your existing nodes with their instance types, resource utilization (CPU and Memory), hourly costs, and monthly costs
- Optimized proposal: The recommended configuration showing how nodes will be replaced with more cost-effective alternatives
- Projected savings: Both monthly and annual cost reductions
Example Migration Benefits:
Before Roll:
- 3 nodes (t3.medium, on-demand)
- Total vCPU: 5.79 → Optimized: 3.66 (36.8% reduction)
- Total Memory: 9.70 GB → Optimized: 6.15 GB (36.6% reduction)
- Monthly cost: $96.60 → Optimized: $18.70
- Monthly savings: $77.90 (80.7% reduction)
Safety During Initial Roll #
The initial roll operation follows the same strict safety protocols as ongoing defragmentation:
- New nodes are provisioned and verified as Ready before old nodes are drained
- Workloads are gracefully migrated respecting Pod Disruption Budgets (PDBs)
- Nodes with pods using ephemeral local storage or standalone pods are excluded
- The process runs in controlled batches to maintain cluster availability
- Real-time progress tracking shows the status of each batch and node transition
Starting Your Initial Roll #
- Complete Steps 1-4 of the StackBooster onboarding process
- At Step 5, review the optimization plan showing:
- Current cluster costs and configuration
- Proposed optimized configuration
- Estimated savings
- Click Start roll to begin the migration
- Monitor the progress as nodes are replaced in batches
- Once complete, proceed to Step 6 to configure automation
The initial roll typically completes within 10-30 minutes depending on cluster size, but timing may vary based on cloud provider provisioning speed and workload eviction policies.
How It Works #
When you initiate a defragmentation roll (either as an initial migration roll or an ongoing optimization), the system evaluates your current node and pod placement and proposes an optimized configuration. This includes:
- Estimated hourly savings
- Overview of nodes planned for removal and replacement, with detailed configuration of newly proposed nodes
- Per-node breakdowns of utilization, instance type, and pricing
- A summary view comparing current vs. optimized state
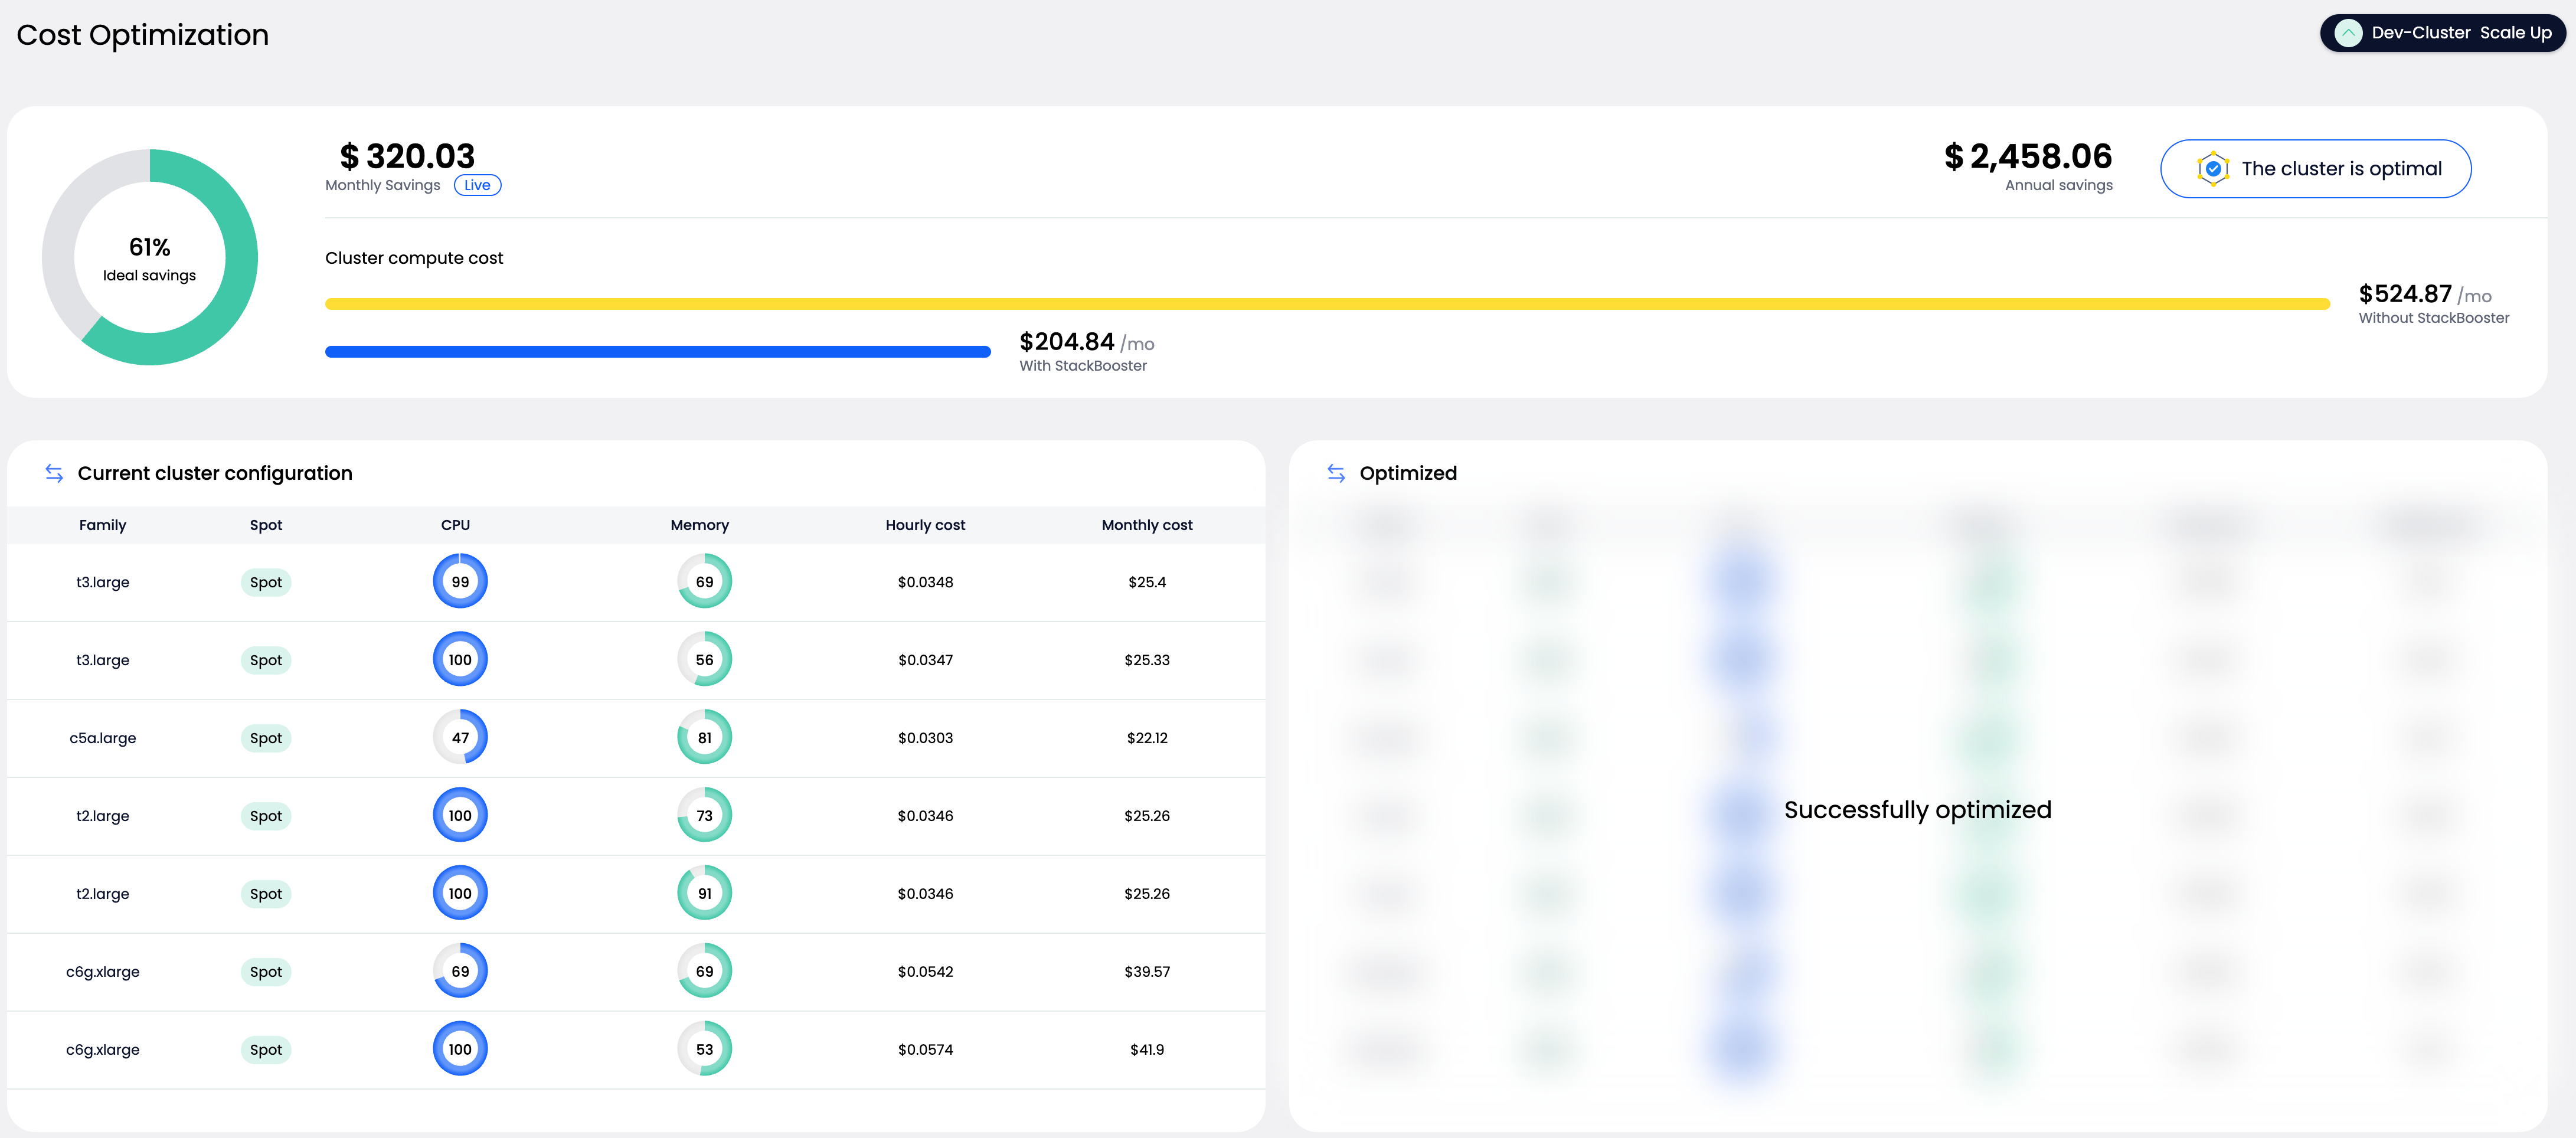
If the analysis shows that your cluster is already cost-efficient, you’ll see a message confirming that no action is needed.
If a roll is started, nodes are replaced in safe, controlled batches. Each new node is verified as Ready, and pods are confirmed to be running before proceeding to drain the corresponding old nodes. This continues until all planned replacements are complete or skipped if unnecessary.
Safety and Reliability #
To ensure your workloads remain uninterrupted, defragmentation is performed with strict safety measures:
- Nodes are only replaced when their workloads can be safely rescheduled.
- Pods protected by Pod Disruption Budgets (PDBs), using ephemeral local storage, or not managed by a controller (e.g. standalone pods) are excluded from replacement.
- Nodes are rolled out in controlled batches, and each new node must pass readiness checks before its corresponding old node is drained.
- If a node fails to provision (e.g. due to lack of capacity), it is skipped and logged without blocking the process.
- Draining respects pod eviction policies and timeouts, allowing for graceful transitions.
These safeguards maintain service stability while enabling cost-efficient optimization.
Launching a Defragmentation Roll #
For Existing StackBooster Clusters #
To initiate the defragmentation process for an existing StackBooster-managed cluster, go to the Defragmentation tab in your cluster view.
If the cluster is eligible for optimization, you will see:
- Projected savings (monthly and annual)
- Current node configuration: showing instance types, resource utilization, and costs
- Optimized plan: a preview of the more cost-efficient configuration
To begin the operation:
- Review the optimization plan and projected benefits
- Click the Start saving now button
Once started, the UI will display real-time progress including batch execution status and node transitions.
If the system detects that your cluster is already in an optimal state, it will display a clear message indicating no action is required with a badge showing “The cluster is optimal”.
For New Migrations #
For clusters being migrated to StackBooster for the first time, follow the onboarding wizard and initiate the roll at Step 5 as described in the Migration from Non-StackBooster Clusters section above.
Understanding Optimization Results #
After a defragmentation roll completes, you’ll see detailed before/after comparisons:
Metrics Displayed #
- Cluster Price: Total hourly cluster cost and percentage reduction
- Node Count: Number of nodes before and after optimization
- Total vCPU: Allocated CPU resources and percentage change
- Total Memory: Allocated memory resources and percentage change
- Savings Breakdown:
- Monthly savings amount
- Annual savings projection
- Current cost with StackBooster
- Cost without StackBooster (unoptimized)
- Percentage savings achieved
Per-Node Details #
For each node in both before and after states, you can view:
- Family: Instance family (e.g., t3.medium, t4g.medium, c5g.large)
- Spot: Whether the node is a spot or on-demand instance
- CPU: CPU utilization percentage
- Memory: Memory utilization percentage
- Hourly cost: Cost per hour for the node
- Monthly cost: Projected monthly cost for the node
Typical Performance #
| Nodes replaced | Batches | Expected duration* |
|---|---|---|
| 2-5 | 1-2 | ~5-10 min |
| 5-10 | 2-3 | ~10-15 min |
| 10-50 | 3-5 | ~15-30 min |
| 50-200 | 5-10 | ~30-60 min |
*Actual timing may vary based on workload readiness, provisioning delays from the cloud provider, and the time needed to gracefully drain workloads from old nodes as defined by your eviction policies and timeouts.
Best Practices #
When to Run Defragmentation #
- After initial cluster migration: As part of the onboarding process (Step 5)
- After significant workload changes: When you’ve added or removed major applications
- Following cloud provider price updates: When instance pricing changes in your region
- Periodic optimization: Every 1-3 months to maintain cost efficiency
- After prolonged scaling activity: When your cluster has experienced extensive autoscaling events
Monitoring During Defragmentation #
While defragmentation is running:
- Watch the progress indicator: Shows percentage complete and current batch
- Monitor node status: View which nodes are being added/removed in real-time
- Check the bottom notification bar: Displays “Defragmentation In Progress” with real-time updates
- Review batch completion: Track how many nodes have been successfully optimized
Post-Defragmentation #
After completion:
- Verify all workloads are running normally
- Review the final cost comparison
- Check node distribution and resource utilization
- Configure or update automation settings (Step 6) if needed
Troubleshooting #
Common Scenarios #
Defragmentation shows 0% savings
- Your cluster is already optimally configured
- No action is needed
Some nodes weren’t replaced
- Nodes may contain workloads with ephemeral storage
- Pods might not be managed by a controller
- PDB constraints might prevent eviction
- Cloud provider may lack capacity for the desired instance type
Roll takes longer than expected
- Workload eviction respects PDB settings and drain timeouts
- Cloud provider provisioning delays
- Complex pod scheduling requirements
Getting Help #
If you encounter issues during defragmentation:
- Check the real-time progress logs in the UI
- Review the notification messages for specific errors
- Consult the StackBooster documentation
- Contact StackBooster support with your cluster details
Summary #
Cluster Defragmentation is a powerful cost optimization tool that safely reorganizes your Kubernetes infrastructure for maximum efficiency. Whether you’re migrating an existing cluster through the initial roll process or performing periodic optimization on a StackBooster-managed cluster, the operation ensures your workloads run on the most cost-effective nodes while maintaining full availability and respecting all safety constraints.
With potential savings of 60-85% on compute costs, regular defragmentation helps you maintain an optimal balance between performance and cost throughout your cluster’s lifecycle.